A Quick Guide to Adding YouTube Annotations
July 3, 2013

Introduction
Video is a powerful tool, but incorporating it into your content marketing can be costly and time-consuming. After spending precious time determining your budget, hiring a crew, scheduling interviews, prepping for the shoot, and, of course, finding an editor, you might feel eager to upload your video to YouTube, tweet the link, and call it a day. Sound familiar?
What you may not realize it that you’re missing out on one of YouTube’s most valuable features: annotations.
Annotations add an interactive level to your videos by allowing you to add notes, link to other videos, and even promote your blog. The best part: Annotations are free and take merely minutes to add.
A Quick Guide to YouTube Annotations
Accessing the YouTube Annotations Page
- Go to your “Video Manager”
- Click “Edit” on the video you would like to annotate
- Select “Annotations”
Types of Annotation
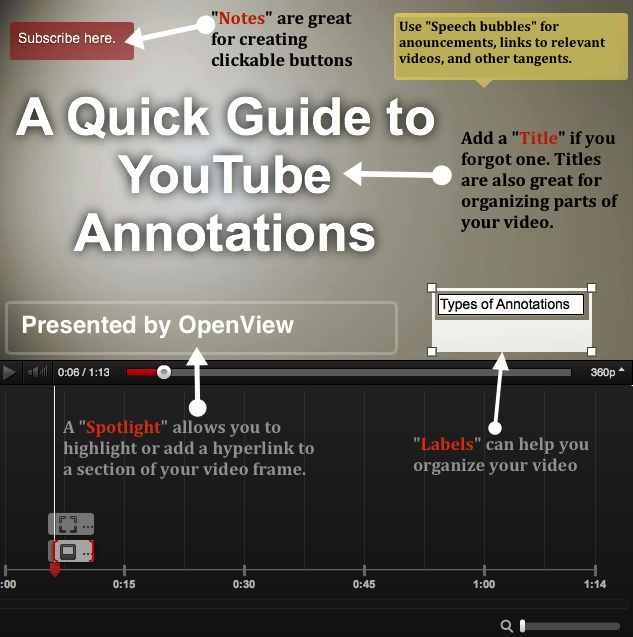
- Speech Bubbles: Add announcements or other tangents to you video.
- Notes: Like speech bubbles, notes are great for announcements. Notes are also great for creating buttons.
- Title: Add a title or subtitle to your video.
- Spotlight: Draw attention to a particular part of your video. When the viewer hovers his/her cursor over the spotlight, a note will pop up. You can even link your spotlight to another video or website.
- Label: Is your video a little too long and disorganized? Add a label to guide viewers.
Customizing the Annotation
- Placement: Adjust the placement of your annotation by dragging it. Adjust the size of it by dragging on the corners.
- Text: Customize your text by changing its size and color.
- Timing: Adjust the “Start” and “End” to the time in the video you want the annotation to appear. For example, you might want your “Title” annotation to start at 0:00:00 and end at 0:00:05.
- Link: This gives you the option to link to other YouTube videos, channels, and external websites. There is even a link you can add that automatically subscribes the viewer to your channel. When linking to videos, you can also select what time you want the linked video to start at (ex: the beginning or 30 seconds in, etc.).
Reviewing Annotation
- Click on the beginning of your video or a few seconds before the start of your annotation.
- Click the “play” button to preview your video.
Publishing Video
- Click “Save.”
- Click “Publish.”
A Visual Walk-Through
Tips and Tricks
- Promote Your Website: Create an eye-grabbing “Speech Bubble” asking viewers to view your website or check out your newsletter. Link to the website or newsletter, as along as it’s an associated website. To learn more, click here.
- Link to a playlist: Is your video part of a YouTube playlist? Create a “Note” telling viewers to view the rest of the playlist. Link to video in the playlist. Set the “Start linked video at” time to correlate with the annotation so your viewers don’t lose their place.
- Play around with color: If you have multiple annotations in the same frame, use contrasting colors to keep viewers interested.
- InVideo Programming: In addition to annotations, you can also customize your videos with InVideo Programming. Go to “Channel Settings” and click “InVideo Programming.” These settings will be applied to all your videos. “Feature Channel” will insert a thumbnail image into all your videos linking to your Channel Page. “Feature Video” applies a thumbnail to your all your videos linking to a video of your choice.
Have you had success incorporating YouTube Annotations? What results have you seen?